

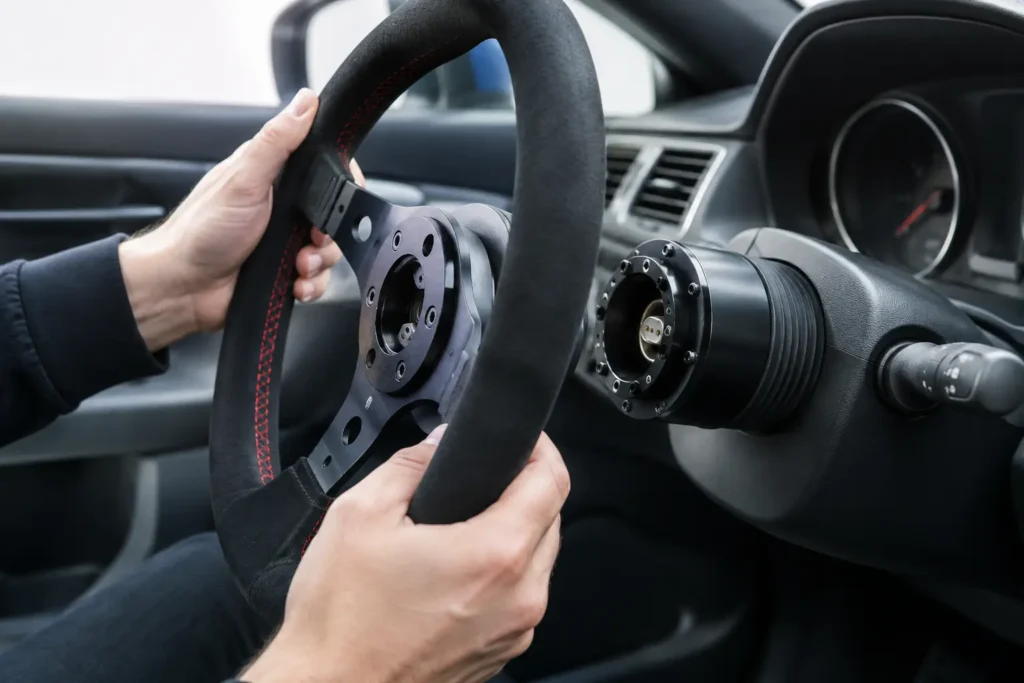
A quick release steering wheel is not a cosmetic shortcut. In a drift car, it can make getting past a fixed bucket seat far easier. In a race build, it gives the driver a clean exit in an emergency. But if the hub, spline, bolt pattern or electrical setup is wrong, the result can be steering play, lost horn function or a wheel that is simply unsafe to use.
This guide covers how to install quick release steering wheel hardware on a typical modified vehicle. The procedure applies to most two-piece motorsport systems: a vehicle-specific boss or hub adaptor, a quick release coupling and a compatible steering wheel. Exact torque figures, wiring layouts and airbag procedures vary by vehicle and manufacturer, so treat the instructions supplied with your parts as the final authority.
Choose the correct quick release setup first
A quick release is only as good as the parts behind it. You need a vehicle-specific hub adaptor that matches the steering column spline and retention method, plus a quick release that matches the adaptor and steering wheel bolt pattern. Many aftermarket wheels use either a 6 x 70 mm or 6 x 74 mm PCD, but never assume. Check the pattern before ordering.
The quick release itself should suit the job. Ball-lock and spline-style couplers are common on drift and track cars because they provide positive engagement with minimal free play. A quality unit should lock with a clear mechanical action, not rely on a vague friction fit. Test it on the bench before it goes near the car.
Wheel position matters too. A quick release adds height between the hub and wheel, often around 40 to 60 mm. That may improve reach in a car with a deep bucket seat, but it can move the rim too close to your chest, indicators or windscreen stalks. Consider dish depth, seat position and steering-column adjustment together rather than buying parts individually.
For a road-driven vehicle, check the legal and insurance implications before removing an airbag-equipped steering wheel. An airbag delete, warning light or non-functioning horn can cause MOT and road-use issues depending on the vehicle and how it is registered. Quick releases are primarily motorsport hardware. Build accordingly.
Tools and preparation
Park on level ground with the front wheels pointing exactly straight ahead. Centre the steering wheel before removal, then take a photograph of its position relative to the dashboard. This simple reference can save time when aligning the new hub.
You will usually need a socket set, ratchet, extension bar, Torx or Allen keys, a steering-wheel puller if the original wheel is tight, a torque wrench and medium-strength threadlocker if specified by the quick release manufacturer. A multimeter is useful for horn wiring and any button or paddle-shift circuits.
If the car has an airbag, disconnect the negative battery terminal and allow at least 10 to 15 minutes before touching airbag connectors. This gives the restraint system time to discharge. Do not probe airbag connectors with a test lamp or multimeter, and never put your face in front of an undeployed airbag module.
Remove the factory steering wheel carefully
Access to the original wheel retaining bolt or nut normally requires removal of the airbag module or centre pad. Release it using the factory procedure for your vehicle. Some wheels use rear-mounted spring clips, while others use Torx fasteners accessed through holes behind the wheel.
With the airbag or centre section removed, disconnect the horn and airbag plugs carefully. Most airbag connectors have a coloured secondary lock. Do not force them. Set the airbag module facing upward in a clean, stable area away from static electricity, heat and impact.
Mark the relationship between the steering shaft and the original wheel with a paint pen if there is no obvious factory alignment mark. Loosen the retaining nut or bolt a few turns, but leave it threaded on while pulling the wheel free. This prevents the wheel from striking you if it releases suddenly.
If the wheel is seized, use a suitable puller rather than hitting the steering shaft. Pulling aggressively on the rim can damage the clock spring, column bearings or trim. Once loose, remove the retaining hardware fully and lift the steering wheel away without rotating the clock spring.
Install the hub adaptor
Before fitting the hub, inspect the clock spring or slip ring. If you need to retain horn wiring or steering-wheel controls, it must remain centred. Rotating it after the wheel is removed can tear the internal ribbon cable when you later turn to full lock.
Slide the vehicle-specific hub adaptor onto the steering shaft, aligning its master spline, mark or flat where applicable. The hub should sit fully home without being driven on with a hammer. If it will not seat, stop and verify the application and spline count. Forcing an incorrect hub can damage the column.
Set the hub straight using your earlier reference marks and the front wheels as a guide. Install the original or supplied retaining nut or bolt, then torque it to the vehicle manufacturer’s specified steering-wheel fastening torque. This figure is vehicle-specific, so do not substitute a generic internet value.
At this stage, turn the steering from lock to lock while the front end is safely supported if necessary. Confirm that the hub clears the column shrouds and does not foul stalks, trim or dashboard panels. A hub that contacts surrounding trim will eventually loosen fasteners or create unwanted steering resistance.
How to install quick release coupler and wheel
Most systems have a fixed base that bolts to the hub adaptor and a removable section that bolts to the steering wheel. Identify which half is intended for each location. The release mechanism must remain accessible when the wheel is fitted, and any alignment mark should be positioned at the top.
Bolt the fixed quick release section to the hub using the supplied high-tensile fasteners. Apply threadlocker only where the manufacturer calls for it, then tighten the bolts evenly in a criss-cross pattern. Torque them to the coupling manufacturer’s specification. These bolts carry steering loads, so avoid unbranded hardware, damaged Allen bolts and guesswork.
Fit the removable section to the steering wheel using the same approach. If the wheel has a horn button, route its wire through the centre opening before tightening the wheel bolts. Ensure the wire cannot be pinched between the wheel, quick release faces or mounting flange.
Connect the two quick release halves. A correct connection should engage fully with an audible or tactile lock. Pull firmly on the steering wheel in every direction. There should be no movement between the coupling sections, no rattle and no partial engagement. Release and refit the wheel several times until you understand the mechanism without looking at it.
Wire the horn and retain essential functions
A basic horn circuit usually needs a switched earth through the horn button, but vehicle wiring varies. Many hubs include a contact ring or flying lead for the horn. Connect the vehicle horn feed to the hub terminal and run the corresponding wire to the horn button terminal. The button normally grounds through the steering wheel or a dedicated earth wire.
Test the horn with the battery reconnected only after all airbag-related connectors are safely dealt with. If it does not work, use a multimeter to trace continuity rather than joining wires at random. A horn that sounds continuously normally indicates an unintended earth at the button or contact ring.
Steering-wheel buttons, cruise control, paddle shifters and airbag circuits require a more considered solution. Some builds retain functions through dedicated multi-pin quick release connectors, while others delete them for competition use. Do not attempt to bypass a safety restraint system with resistors or improvised wiring unless you fully understand the vehicle’s supplemental restraint system and the consequences.
Final checks before driving
With the car stationary, check that the wheel releases and locks correctly, the horn works, and the wheel turns freely from lock to lock. Confirm the steering is centred during a slow, straight roll. If the wheel is off-centre, remove it and correct the hub alignment rather than driving around with the coupling fitted crooked.
After the first short drive, inspect every mounting bolt and the steering-shaft retaining fastener. Recheck after a track day, drift event or any hard kerb strike. Quick release hardware lives in a high-vibration environment, particularly in solid-mounted, high-power cars.
The right setup should feel completely solid: no click, no flex and no question about whether the wheel has locked. If there is any play or uncertainty, park the car and correct it before the next run. Steering hardware is one area where proper fitment is performance.